Previously, we described the method for DNA fragment knockout in the genome mediated by two dual guide RNAs. Compared with the single guide RNA mediated gene mutation, the dual guide RNAs/Cas9 system has a great deal of advantages, such as higher efficiencies, easy to screen the positive clones, much more optional for guide RNA design ( you can design two guide RNAs in the intron), selectively knocking out one isoform of genes without affecting other isoforms etc. The primary version of Dual guide RNAs/ Cas9 system is in the common mammalian expression cassettes, which is limited for using for primary and hard transfected cells. Now, to resolve these hurdles, we developed the Dual guide RNAs/ Cas9 system in lentivirus backbone, which contains lentiCRISPR-Dual-Puro, lentiCRISPR-Dual-GFP, Topo-Dual, pdR8.2, pMD2.G
What is the CRISPR-Cas9 system?
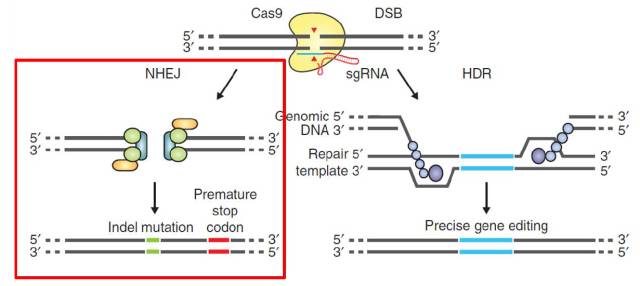
Figure 1. Overview of CRISPR-Cas9 system
CRISPR-Cas9 system is a widely used genome editing tool, which derives from the bacteria adaptive immune mechanism. As an engineered version, nowadays CRISPR-Cas9 system contains one enzyme Cas9 and one guide RNA. This guide RNA can direct cas9 to specific genome locus for further digestion. As shown in Figure 1.
So far, CRISPR-Cas9 system has two main applications: Gene knock-out and Gene knock-in. For gene knockout, once DNA double strand breaks are induced, the cells will repair the break through NHEJ DNA repair pathway which will cause tiny deletion or insertion. For gene knock in. with the homolog recombination template, the cells will be inserted one specific foreign sequence in genome.
Fragment deletion (Gene knockout) mediated by two digesting events
Compared with previous strategy, this protocol uses a different approach to achieve deletion of DNA fragment in specified size. In this protocol, two guide RNAs targeting adjacent sites of certain region are needed, and two digesting events mediated by Cas9 will cause the degradation of internal fragment. Then the ends will be ligated through NHEJ pathway. In the end, this strategy can cause fragment deletion in specified size. With this protocol, one or some exons can be deleted, or whole genes can be deleted. The diagram is shown in Figure 2.
To achieve higher knockout efficiency, vector carrying one cas9 protein and two guide RNA expressing cassettes is generated.
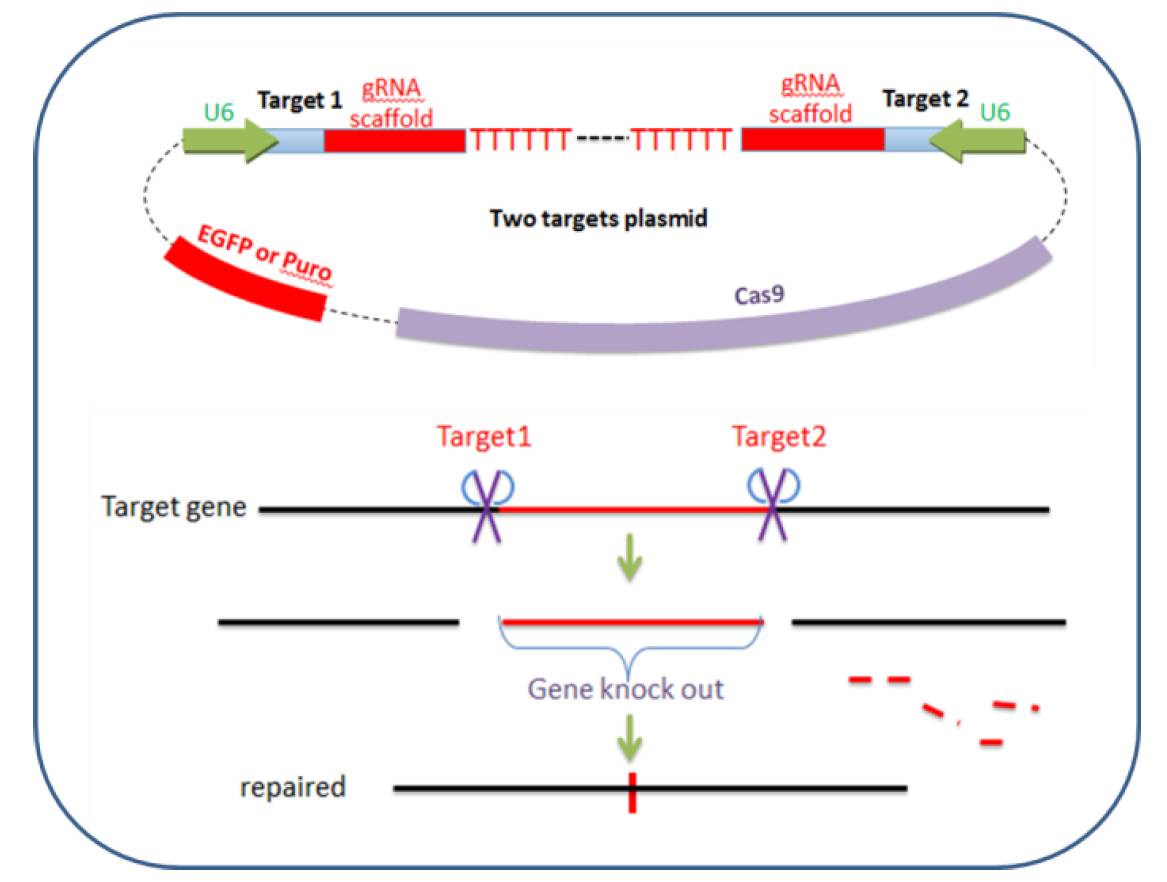
Figure 2. Diagram of Cas9-2hitKO system
Plasmids for this protocol
To achieve the higher editing efficiencies and crash the hard transfected cells hurdles, lenti viral vector harboring one cas9 protein and two guide RNA expressing cassettes is generated. In this protocol, three plasmids are involved. lentiCRISPR-Dual-puro and lentiCRISPR-Dual-GFP contain cas9 and one Guide RNA expressing cassette. Adding another MCS is for the inserting of the second Guide RNA expressing cassette. Topo-Dual is generated for the second guide RNA expressing cassette.
lentiCRISPR-Dual-GFP contains EGFP for fluorescent sorting; lentiCRISPR-Dual-puro contains puromycin resistant gene for drug selection.
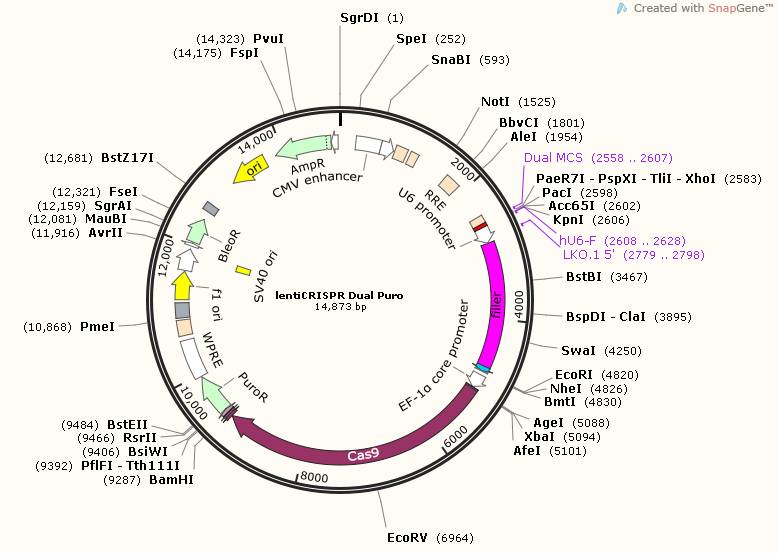
Figure 3. Map for lentiCRISPR Dual Puro
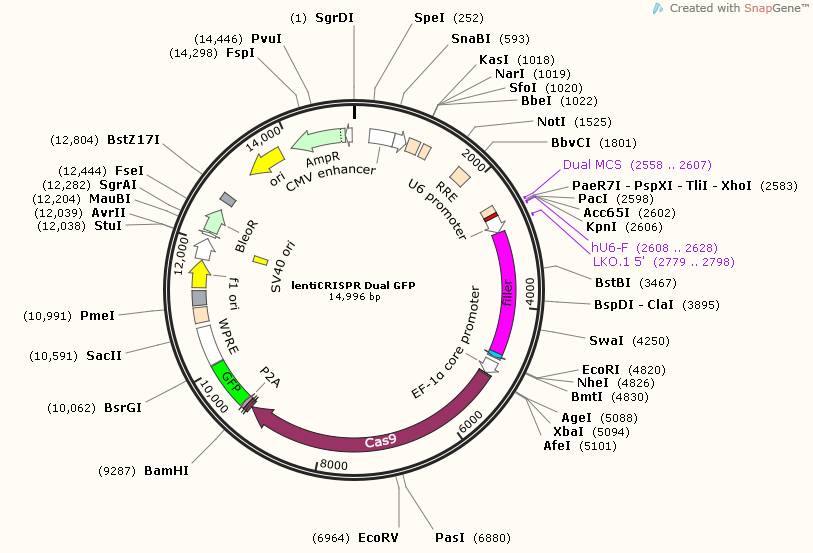
Figure 4. Map for lentiCRISPR Dual GFP
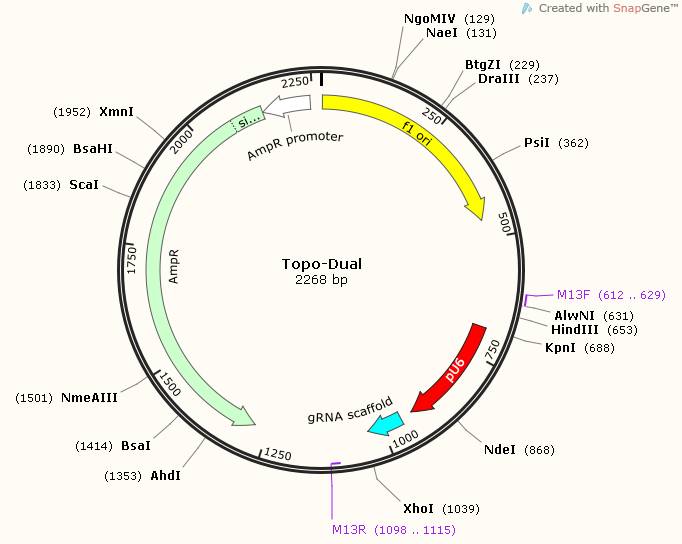
Figure 5. Map for Topo-Dual
Assembly of Guide RNA
According to Zhang Feng lab’s protocol, guide RNA can be easily assembled through an ingenious strategy. This strategy is shown in Figure 6. When Guide RNA scaffold is digested by BbsI, an annealed duplex with specific sticking ends (as 20 Nucleotides’ target) will be ligated in this plasmid through T4 DNA ligase.
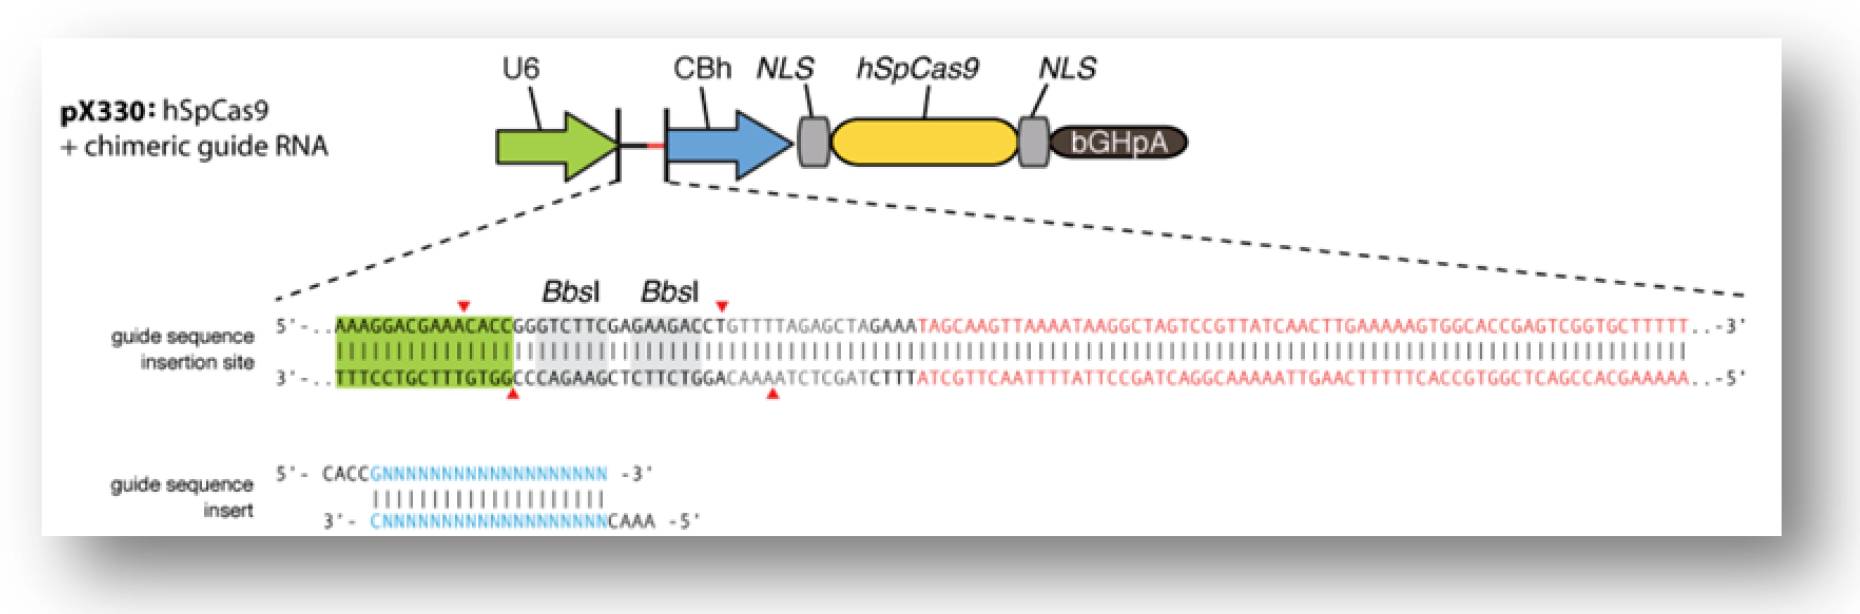
Figure 6. Strategy for guide RNA assembly
………………………………
Procedure
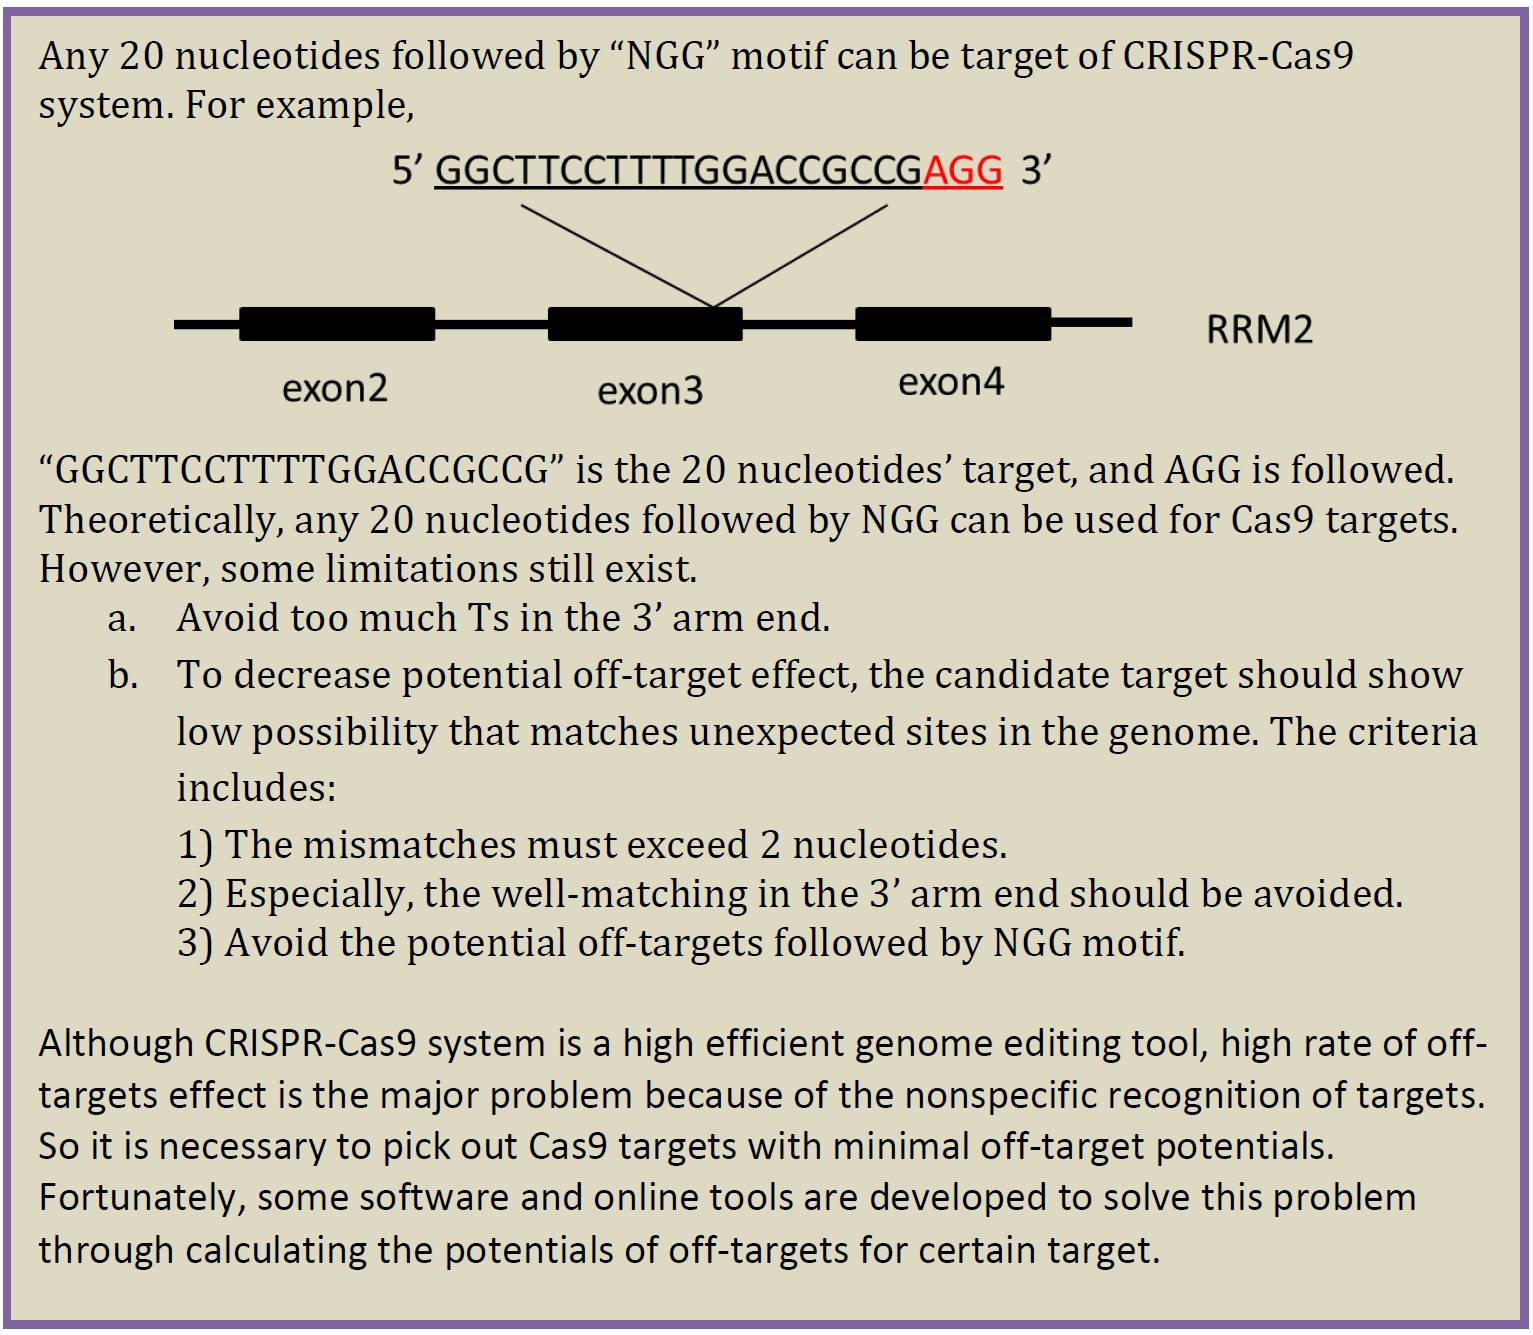
I. Pick Cas9 target with minimal off-targets potentials
Website for target prediction
http://crispr.mit.edu/. The brief manual is as below (Figure 7.)
1. Input no more than 250 nts’ genomic DNA sequence to the input box, and pick the corresponding species. Then click button ‘submit’.
2. Click button ‘Guides & offtargets’.
3. Choose targets whose scores > 90. The targets can be in both orientations.
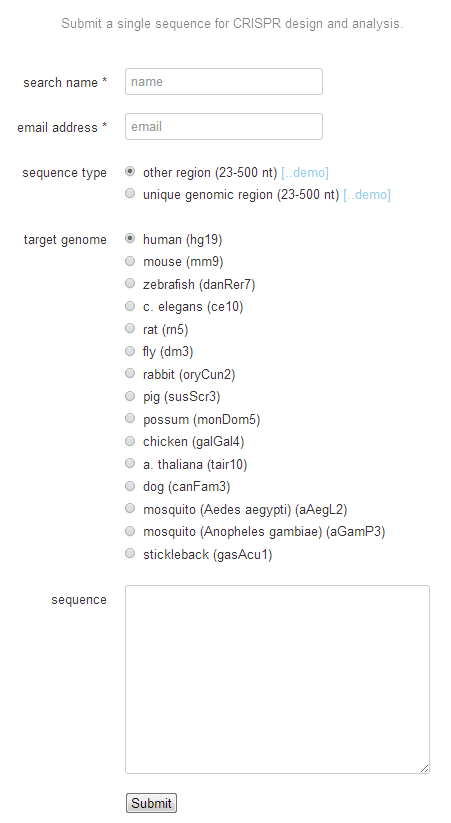 Figure 7. Submission of
prediction of guide RNA target
II. Pick a pair of Cas9 targets to delete the objective DNA fragment
To delete a genomic DNA fragment, two targets recognized by guide RNA are indispensable. According to previous test, as long as 1M bps sequence can be deleted efficiently. However, fragment deletion of <10 kbs should be fine and efficient enough. The criteria of choice on target pair is as followed, ( Figure 8 and Figure 9 are two examples)
a. If the interested gene is short (about 10 kbs, or a little larger), just delete the whole gene including promoter region.
b. If the interested gene is large, deleting the most important exon or exons should be a good choice.
c. If the interested gene is large, an alternative is deleting a part of the gene including whole promoter region
d. If the interested gene was knockout by traditional strategy previously, just delete the same region.
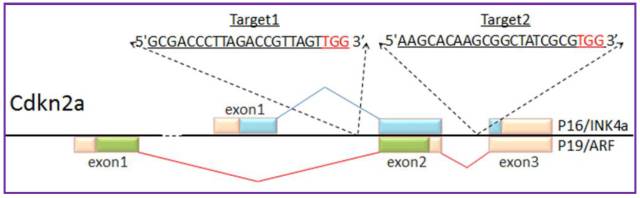
Figure 8. Cdkn2a Cas9-targeting
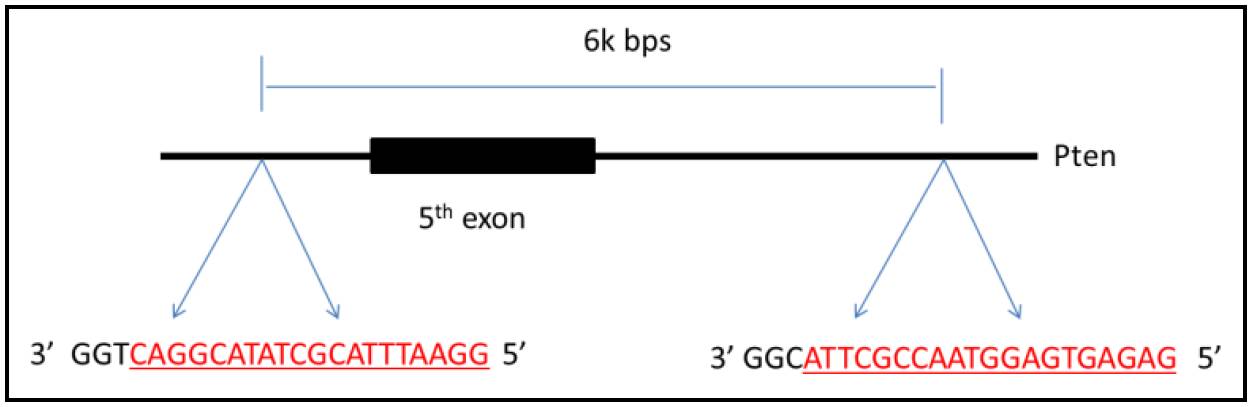
Figure 9. PTEN Cas9-targeting
III. Construct CRISPR-Cas9 vector carrying two Guide RNA expressing cassettes
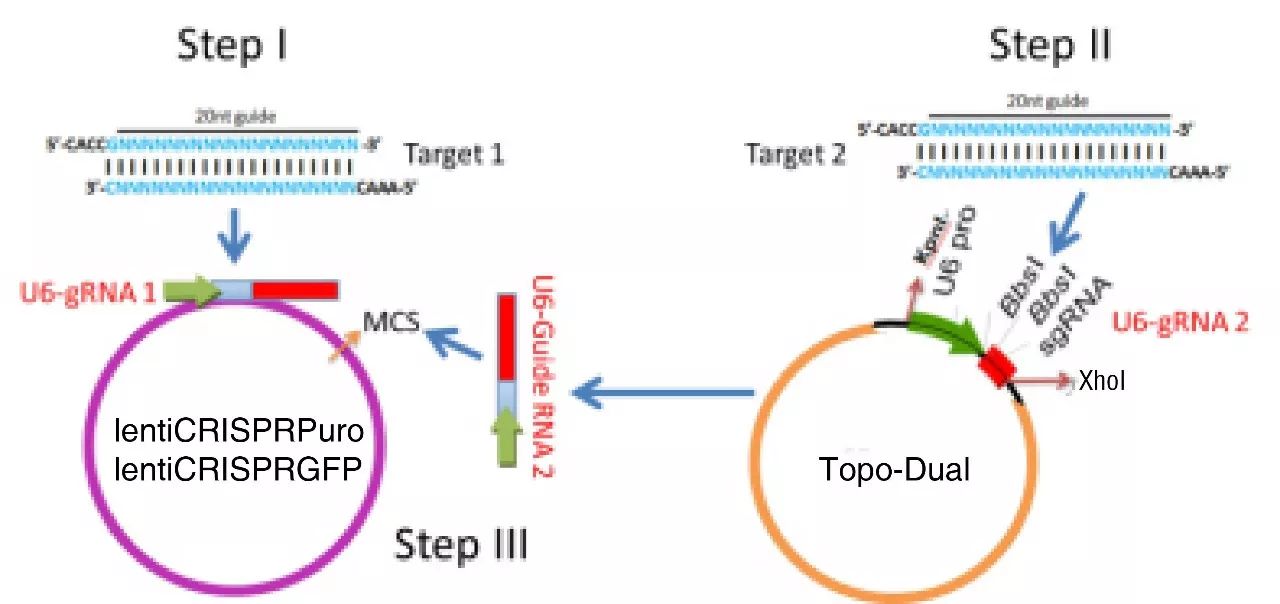
Figure 10. Overview of construction
1. Synthesis target oligos.
Oligo-Forward: CACC-(N)20
Oligo-Reverse: AAAC-(N)20RC
If the first nucleotide of the target sequence is not ‘G’, just add one ‘G’ to the 5’ end. The oligos become
Forward: CACC-G(N)20
Reverse: AAAC-(N)20RC
2. Annealing
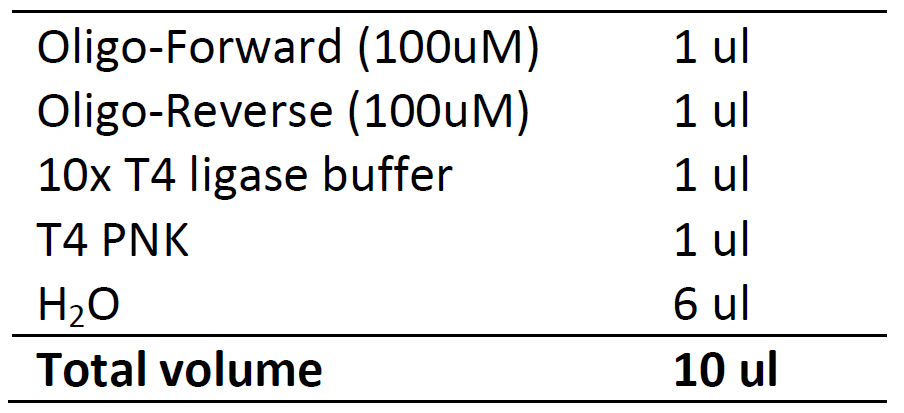
On thermal cycler with heat lid.
37 ℃, 30 min
95 ℃, 5 min
Ramp down to 25℃ at 0.1℃/sec. (when step 25℃ is highlighted, click option, set Ramp as 0.1℃/sec)
25 ℃, 5 min
4 ℃, 5 min
Put on ice, or keep in -20℃ freezer for storage.
3. Digest lentiCRISPR Dual Puro (or lentiCRISPR Dual GFP) with BsmBI and Topo-Dual with BbsI

Purify the enzyme digested product with PCR product purification kit, and make sure that the concentration is more than 50 ng/ul.
4. Ligation
Dilute the annealed target oligos 200 times for further ligation
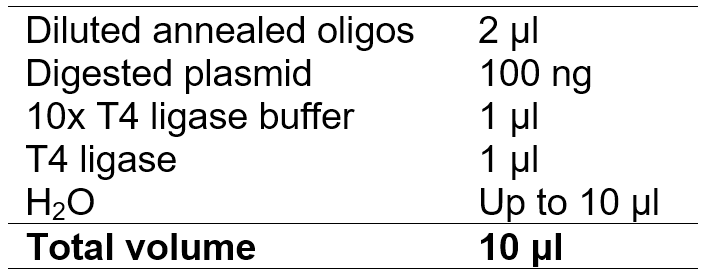
Ligate for more than 2 hours at 16 ℃. (Overnight is better.)
5. Transformation and identification of positive clones
Pick single clones and culture for several hours in 37℃ incubator, and perform PCR to identify the positive clones.
For lentiCRISPR Dual Puro and lentiCRISPR Dual GFP, use Oligo-Forward and CAG-R as primers; for Topo-Dual, use Oligo-Forward and Topo-F as primers.
6. Digest Guide RNA Target2 expressing cassette in the Topo-Dual and lentiCRISPR Dual Puro-Target1(or lentiCRISPR Dual GFP-Target1)
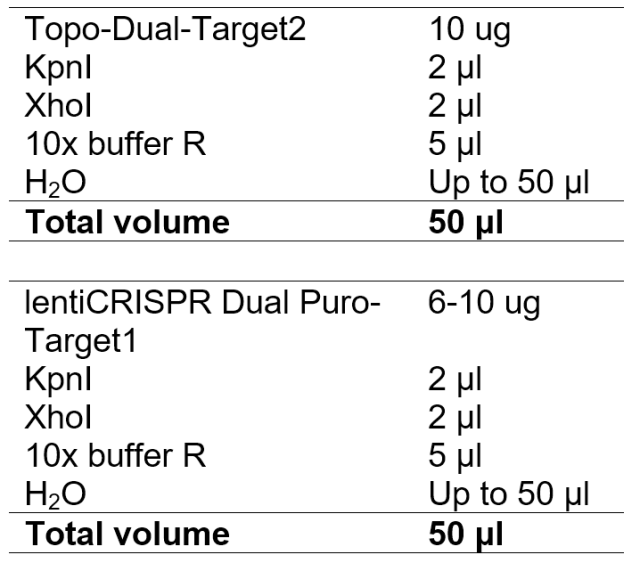
7. Gel extraction and purification
For EZ-GuideXH-Target2, cut and purify the smaller DNA band about 360 bps; for the PX458M-Target1, cut the unique main band about 9300 bps.
8. Ligation
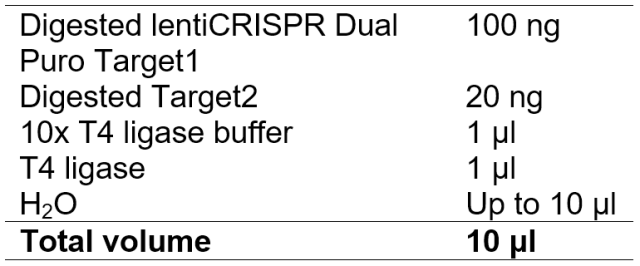
Ligate overnight at 16 ℃.
9. Transformation and identification of positive clones
Use Oligo-Forward (target1) and CAG-R as primers, and the PCR product is about 600 bp.

10. Plasmid extraction and sequencing validation.
Culture the positive clone in 10 ml Amp+ LB medium, and extract plasmid.
Use CAG-R , Topo-F as sequencing primer.
IV. Assess knockout efficiency in 293FT cells (or other cells)
1. Transfect lentiCRISPR Dual GFP plasmid carrying Guide RNA expressing cassettes in 293FT cells for 36-48 hours. For mouse genes, MEF, 3T3 and some other easy-transfect cells can be used.
2. Detect the GFP Fluorescence through fluorescent microscopy or examine the transfection efficiency through Flow cytometer.
3. Extract genomic DNA from transfected cells. And perform genotyping with these gDNA samples. If the mutant PCR band is obvious and strong enough, the pair of Guide RNAs can be regarded as efficient.
V. Lentivirus production
—-Lentiviral Production Protocol—-
The day before transfection:
The day before transfection, seed around 5×10⁶ HEK293FT cells per 100mm petri dishes.
The day of transfection:
1. Check to make sure cells are at least 70% confluent before transfection
2. Combine the appropriate amount of plasmid DNAs in a 1.5ml conical tube:
For per100mm petri dish:
10 μg Lentivirus backbone plasmid harboring inteterest gene
4 μg pdR8.2. (structural vector)
2 μg pMD2.G (envelope vector)
16 μg in total
3. Add filtered water to a final volume of 878μ1.
4. Add 122μ1 2M CaCl2 and mix.
5. Drop 1000ul of 2xHBS to the abvove mixture slowly. Note: Shaking the tube continuously to avoid generating large particles
6. Sit mixture at room temperature for 2min.
7. Remove old media and replace with 9 ml new complete culture media.
8. Add all of mixture to the cells gently and evenly. Swirl the petri dish to distribute evenly and put it back to incubator.
9. 8 hours later, Change media to remove the transfection reagent and replace with 12 ml new complete culture media.
10. Generally, 72 hours after transfection , harvest cell culture supernatant containing lentivirus and filter through a 0.45μm filter.
11. Concentrate the lentivirus with PEG8000 or with ultra-speed centrifugation.
Transfection reagent stock preparation:
2 M CaCl2
2xHBS: 50mM HEPES
10mM KCl
12mM Dextrose
280mM NaCl
1.5mM Na2HPO4
Resuspend in 900 ml H2O, adjust pH to 7.04 (with NaOH if using HEPES free acid, with HCl if using HEPES sodium salt). Raise volume to 1000 ml and carefully re-adjust final pH to 7.05 exactly (Note: pH needs to be very precise at pH 7.04 – 7.05). Filter through 0.22μM and store in aliquots at -20°C (good for up to 6 months).
Suggestions and Tips: You can also choose other transfection reagents including lipofectamine2000, PEI and Turbofect (Thermo/Fermentas). Remember that the transfection efficiency should be over 90 percent.
VI. Knockout in interested cells
Theoretically, any cells transfected with plasmid should be KO cells. However, to get pure KO clones, single clones culture are necessary. Culture of single clones is a little difficult for some cell types. To improve the expansion of single cells, gelatin pre-coating and conditional medium can increase the survival rate of single cells.
1. Plate the cells in 6-well plate one day before, and make sure the cell confluency reach about 70-80%.
2. Transfect the interested cells with validated px459M based plasmid and culture for 24 hours.
3. Treat the transfected cells with 2ug/ml puromycin for 3 or 4 days. Set one mock un-transfected well as control.
Cautions!: before treatment, a pilot experiment is needed to explore the optimized puromycin concentration.
4. Withdraw the puromycin, and culture the cells with 20% FBS medium.
5. Several days later, if independent clones expand, pick the clones and transfer them into 24-well plate for culture. The remained cells keep growing until about 50% cell confluency.
6. When the cells in 24-well plate reach more than 30% confluency, trypsin-digest these wells, take out 80% cells for genotyping, and remain 20% cells for further culture.
7. Quick-spin the cell suspension at 14000rpm for 30s. Remove the supernatant, and lyse the cell pellet with 20-60ul solution A. Heat the lysis at 95 ℃ for 10 min, then add the same volume solution B, vortex for a while, and centrifuge at 13000rpm for 10min. remove the supernatant for PCR template.
8. Do the genotyping, and keep the clones containing knocked-out cells
9. When the clones containing knocked-out cells reach full confluency, digest the cells with trypsin, and count the cell number. Serially dilute the cells in 40 cells/10ml medium by 10-fold.
10. The medium for the step 9 should be the conditional medium. That is, coll ecting medium supernatant of the same cell type (culture time is less than or about 24 hours, avoiding the over-proliferating’s medium supernatant). Add 20% FBS in this supernatant and filter the medium with 0.22 ul filter.
11. Take out 96-well plates, add 100 ul autoclaved 0.1% gelatin solution per well, then incubate in 37 ℃ for at least 30 min.
12. Aspirate the gelatin, and aliquot 100 ul diluted 0.4 cell containing conditional medium per well. Each 8 or 10 wells are added, shake the cell suspension and continue.
13. Add another 100ul conditional medium into the 96-well plate on the fourth or fifth day, and no later than the fifth day.
14. When the cell confluency reach more than 30%, or the clones expand large enough, digest the cells and transfer them into 24-well plate, repeat the step6-8. Keep pure knocked-out clones for further experiment.
15. For the remained cells in step 5. When cell reach 50% confluency, they can also be used for limiting dilution for single clones. Or this mixture can be frozen for later isolation.
VII. Assess off targets effect
Once some clones are identified KO ones. The potential off-target effect should be detected. Website (http://crispr.mit.edu/.) will list all potential off-targets site. Amplify those high-risky off-target site, and examine whether off-target occur through sanger sequency. If any obvious off-targets are not detected, then these clones can be used for further functional experiment.
P.S. Method for quick extraction cell genomic DNA
1.Collect about 2×10⁵ cells, and discard the supernatant.
2.Add 75 μl 25mM NaOH/0.2mM EDTA.(Solution A).
3.Place in thermocycler at 98℃ for 1 hours, then reduce the temperature to 15 ℃
Until ready to proceed to the next step.
4. Add 75 μl of 40mM Tris HCl(pH 5.5).(Solution B)
5. Centrifuge at 4000rpm for 3 minutes.
6. Take an aliquot for PCR (use 2 μl of a 1:100 dilution/reaction).
王老师您好,请问这三个质粒可以在哪里购买?或者可以请您惠赠一下么,不胜感激。